Showing posts with label lips. Show all posts

I Anticipate Us Making Out: Urban Decay's Full Frontal Lipstick Stash

Monday, November 17, 2014


Urban Decay was having a sale, okay? I couldn't resist. Don't give me that look.

I'm always hesitant when it comes to lipstick, because MAC is my go-to, and I have my signature colour and I pretty much stick to it. But I ended up getting myself Urban Decay's F-Bomb Revolution Lipstick  because that is fucking hilarious, and irresistible.

And let me tell you a thing. This colour is amazeballs.

It really is a "Fuck You" Red - bright. bold, and unrelenting. It's a moisturizing formula so your lips don't try out, has just a little shimmer that catches the light when you laugh in the face of your enemies.

So when UD was having their Friends & Fans sale, I scooped up this beauty with a selection of UD's bestselling Revolution lipsticks - they call it the Full Frontal Lipstick Stash, and it features 6 shades in miniature sizes, as well as their 24/7 Glide-On Lip Pencil in Ozone


From Top: Ladyflower, Crush, Illicit, Gash, Liar, and F-Bomb

It's a collection of six super wearable colours, that's for sure. I was actually a little bit disappointed about them being miniature sized, but the great thing about that is you can put it in your purse or pocket or clutch bag and not have to worry about it. Plus, it's great for someone who maybe doesn't wear lipstick everyday, because this way you don't have to worry about shelling out $22 for a whole tube. Instead, you get six for #39, which is a pretty good deal if you ask me. 

So far I'm really loving Crush and Gash, as well as my new baby F-Bomb. If Urban Decay does one thing well, it's bold colours. And that is right up my alley.

And for those of you who are thinking about Holiday gifts, this is a GREAT option for the makeup lovers on your list! 


Color Your Mouth: NYX's Macaron Lippies

Saturday, September 6, 2014


Okay so before I get into actual product reviews, I want to talk about being afraid of colour

Maybe about a month or so my dear friend Nikki linked to my blog on her facebook status. Now, there's a little bit in here about "goth" kinds of things, and one of her friends made a comment about how in her day, a goth girl would never have dreamed of wearing neon. 

And that's probably true. Traditional goth wear is pretty much black/grey/red, with very little desire for variance. And a lot of people, whether they prescribe to a subculture or not, stick to a pretty strict colour palette. I do too, I have colours that look good on me and colours that I wear and colours that I absolutely do not wear (brown, blue, gold).

But theres something to be said for the shock value of bright, unexpected colours. I don't understand why lipstick in particular is typically restrained to traditional reds, berries, pinks, and nudes. It's boring. It's expected. It's the same thing every other bitch is doing.

So why the fuck not wear green lipstick? Why the fuck not wear brighter, bolder shades? Wear every fucking colour of the rainbow on your mouth. Who gives a fuck?

There is something to be said for pushing boundaries and stepping out of your comfort zone, and that something is this: you will never know your own goddess power unless you try new things. Turn heads. Make people stare. Make it worth their time.

That being said, as soon as I saw previews of these lipsticks from NYX I knew I had to get my hands on them. Because I'm weird, and I like crazy colours.

The formula is a little less pigmented than I'd like, and I didn't really love the Black Sesame's grey against my skin tone -  I'd need something more matte and maybe a little darker. But I really love the Lavender and Pistachio colours, and actually I think they're quite wearable. I like bright coloured lips against all black outfits, and it's a perfect unexpected pop of colour. These are really great alternatives to more expensive brands like Lime Crime, and the packaging is pretty dope too.


Overall, I'm pretty pleased!


From The Good Queen: My Amazing Sephora Experience featuring Estee Lauder, Urban Decay, NARS & more!

Sunday, February 2, 2014


I've been in a rut lately. Around Christmas I began trying new moisturizers because my tried-and-true BareMinerals was just not cutting it in this dry winter air. Also, I'm now in my mid-30s and not only is my skin changing, but it's time to get serious about anti-aging. I've also been feeling as if I need an entirely new routine. A dear friend told me that you can get your face done at Sephora for free with a $50 purchase -  how easy is that?! - and I've been searching for a free weekend day to go. That day finally arrived. When I went to make the appointment I discovered that there is another option: a personal beauty consultation. More in-depth and a minimum $125 purchase. Sign. Me. Up.
The appointment is supposed to last for 90 minutes. But thanks to a cancellation, my personal beauty adviser (PBA), Rosita, spent two hours with me. A PBA-in-training, Sharee, set me up in a private room in the back of the store, offered bottled water and snacks, and made me feel like a real VIP.  Sharee removed the tinted moisturizer and concealer I had on with a Caudalie makeup remover product and, because I mentioned dry skin, applied an amazing, life-changing product called GLAMGLOW Thirstymud as a masque. Rosita and I talked for a while at first about my concerns and what I was looking to achieve that day. I also brought along a all the e.l.f. brushes, e.l.f. geometric eyeshadow palette and Stila Portrait of a Perfect Eye my fabulous sister The Evil Queen gave me for Christmas, but I unfortunately have no idea how to use.
The next step was prep. The store was hosting an Estee Lauder global makeup artist and skincare expert named Derek for the day. Rosita had him come in and give me a mini-facial. Derek first cleansed with a product called Perfectly Clean, which is a non-foaming cream cleanser that doubles as a moisture mask. He recommended applying before I get in the shower, letting the product and steam work some magic, and either rinsing or buffing off with my Clarisonic. Then he used a pair of classic serums: Advanced Night Repair and Advanced Night Repair Eye. After the serums he applied Advanced Time Zone eye cream, a new product called Revitalizing Supreme, and Resilience Lift Night for the neck and decolletage.
LESSON #1: "Night" creams and serums can and should be used during the day. 

Between the GlamGlow and the fabulous Estee Lauder products, my skin has never felt better. I bought the GlamGlow, cleanser and serums. They were expensive but worth it. 
I will use the moisturizers I have (Clinique Moisture Surge Intense and Moisture Surge Eye) and will consider the Estee Lauder creams when it's time for new. And one of my self-discovery items that I may keep up forever is Clinique's Take the Day Off oil cleanser. I've been using it at night only for two weeks and I'm obsessed with it. Oils are a new trend that I hope stays around, because this cleanser is an absolute must for my dry winter skin.
Rosita stated with eyes. I had my face done at the BareMinerals boutique once and they did this also. I think the reasoning is so you don't get eyeshadow dust all over your under eye concealer. I've been trying this at home for a few days and it's a trick I will stick with. She applied Urban Decay Primer Potion using a brush, which allows for more control and only the amount of product you need, as opposed to applying with your finger. Rosita taught me how to play with color, which is something I've never been good at, and how to layer and blend eyeshadows. We went through my brushes and pallets at the same time so I could replicate the look at home. She used a BareMinerals Ready 4.0 pallete called The Happy Place: a pretty peach shimmer on my lids, matte grey in the crease, and shimmery plum as eyeliner.
LESSON #2: Apply eyeshadow first.
LESSON #3: Apply eyeshadow primer with a brush.
LESSON #4: Blend your eyeshadows!

Before we got started with foundation, Rosita color matched my face using this neat Sephora + Pantone computer system. Basically, this device takes pictures of your face in three places and spits out a code, which you then plug in to the in-store system or the Sephora website to get a complete list of all the foundations that match your skin color. You can email it to yourself and save it to your Sephora.com profile. No more testers! No more buying something that is perfect in the store but looks weird in natural light! It's pretty amazing. We tried a few different options but settled on Makeup Forever Professional Face & Body Foundation. The product is lightweight, sheer-to-medium coverage, and made of 80% water. Rosita applied Makeup Forever Professional HD primer and foundation using a cute pink Beauty Blender sponge. She applied a NARS concealer to my under eye area in a V-shape, extending the V up past the outer corner of my eye for a lifting effect, and blended with the sponge. Then she added a Sephora Smoothing & Brightening Concealer in rose to the inner eye and dark circles and blended with the sponge. The combined effect was fantastic and I've been able to replicate it successfully at home.
LESSON #5: Have your foundation color matched by a professional. It's free and easy!
LESSON #6: Apply undereye concealer in a V shape for a lifting effect. 

Rosita then brought out a NARS palette called NARSissist cheek: bronzer, Orgasm blush, and highlighter in one. She taught me how to use all three products for a combined sculpting effect that is great for everyday contouring and highlighting without being full-on Kim Kardashian. She finished the look off with a Sephora Collection Nano lip liner and lipstick, and a fantastic Tarte pencil called EmphasEYES Inner Rim Liner in nude that gives a natural bright and awake look. Advising that I shouldn't need to set with powder, Rosita gave me a light spritz of a Caudalie spray by L'Wren Scott and, after checking that the mascara I'd applied at home that morning was still in good shape, I was good to go. 

I've been able to replicate everything successfully at home because the entire concept of the PBA is to teach you how to do it all yourself. I use Urban Decay All-Nighter setting spray before leaving the house in the morning. At lunch, I use translucent powder (BareMinerals READY luminizing Mineral Veil) on my nose to reduce shine. It's been a week and I am very pleased with the long-lasting effects. My skin is happy and I feel fabulous.


QueenGram #2

Thursday, January 30, 2014


How many bags of makeup do you travel with?


This month's Glossybox (so excited for the beauty blender!!!) and December's Ipsy Bag 


Eyeshadow look with Naked 3 (Trick base, Factory in the V, Strange on the crease) and Liquid Eyeliner tests (MAC liquidlast liner, Be A Bombshell eyeliner in onyx, and PUNKER Worlds Baddest Eyeliner by Ardency Inn)

My awkward face from Tuesday night wearing J Cat Beauty Big Lip Pencil in 203 Red Rose (from the Ipsy bag)


Evil Queen Style featuring Body Heat dress from Nasty Gal and boots from Topshop


Evil Queen Beauty's Favourites of 2013 Part 1: Getting Naked with Urban Decay & Fresh skincare

Sunday, January 12, 2014


Happy 2014, Beauty Queens! It's time for the obligatory 2013 favourites post.

I'm going to start off with the best thing that 2013 had to offer, the Urban Decay Naked 3 Palette. The Naked Palettes have been a big hit with the blogger world, but up until now, they've all been too, well, brown. I'm not a brown person, and actually I actively avoid it. All these "natural" palettes are brown and beige and fucking boring. So I haven't really been all that thrilled with the Naked palettes until now. There was a huge buzz when UD announced that they were doing a third version, and I was SO THRILLED to find that it was a beautiful pinky palette. They call them "rose gold" shades, and they range from soft glimmery pinks to more golden colours, and a lovely defining grey and black with red glimmers at the end. It's safe to say I'm in love, and there are so many beautiful combinations that I really feel like I never need another palette again. The colours blend flawlessly and last all day, and the brush that comes with the set is pretty much perfect for creating a multitude of looks. I'm so pleased and it was totally worth the money.


Urban Decay is one of my favourite brands, so the other products I'm putting on this list are the Naked Skin Weightless Ultra Definition Liquid Makeup which I use every day and pair with their Pore Perfecting Complexion Primer Potion and I always set with All Nighter Setting Spray. I used to use their cream-to-powder foundation, but since that has been discountinued, the liquid foundation has been serving me well. I definitely recommend using the primer though as I find it wears a little bit by the end of the work day.

The B6 Vitamin-Infused Complexion Prep Spray was something that came in a sample bag and I was a little bit confused as to what it was for, but I use it before I put on my moisturizer and it really helps my skin absorb the moisture and stay moisturized throughout the day. Right after I shower I spritz it on and I never feel wanting for moisture, even with the winter cold. It's really useful if you have super dry skin like me.


Fresh is definitely my favourite skincare brand of 2013. They're a little bit on the pricey end but I really love the products and they've lasted me a good long time, so I don't regret shelling out for them. The Soy Face Cleanser and Moisturizing Cream are part of my daily skincare routine and have never failed me. My skin has never felt softer and smoother.

The Brown Sugar Body Polish works wonders for my skin. I have very dry skin which can get scratchy and flaky, and this stuff makes everything smooth as all get out. The first time I used it at my boyfriend's place, he said I was "all marinated", so it passes the boy touch test! I use the Sugar Lip Polish before I put on my lipstick and it really helps soothe my chapped winter lips so that my lipstick goes on flawless and stays flawless throughout the day. Pretty much is my entire skincare routine was Fresh products, I'd be really happy. I'd be broke, but really happy, and with fucking flawless skin.

Stay tuned for part 2,


Bang for your buck: ELF cosmetics

Sunday, December 15, 2013


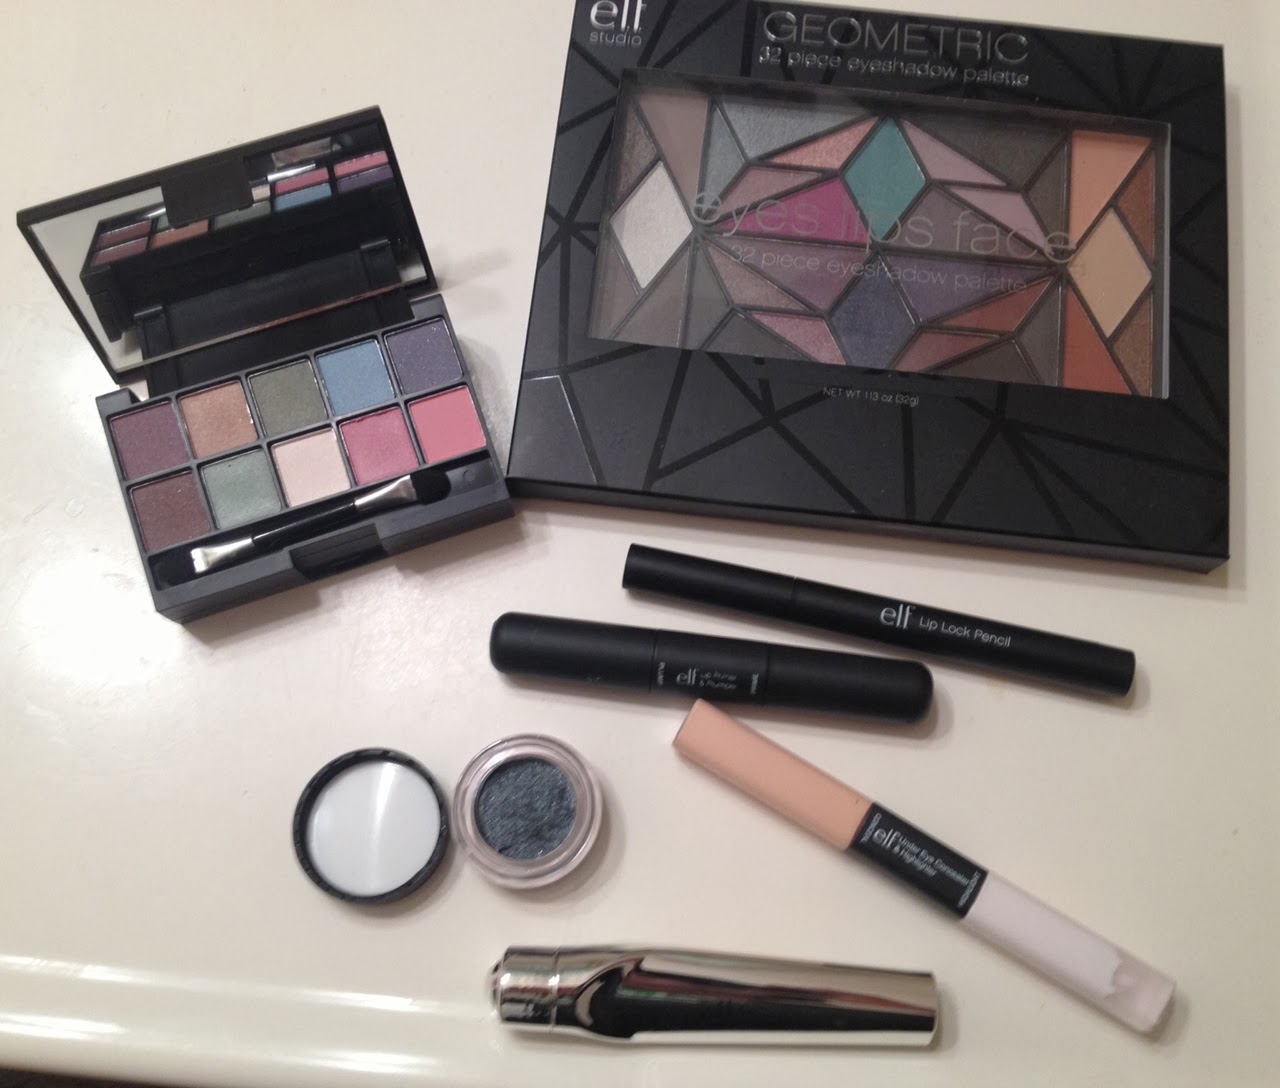
I decided to check out ELF's site because twitter was all abuzz with how great their sales are. And they really are great. I probably spent about $25-30 on both of these hauls, and the second one came with a free complete brush set. ELF has a lot of different palette options for eyeshadows, as well as some great beauty products.

The nail polish cube was maybe one of the best buys out of all this. It was $10, and came with 14 nail polishes. They're mini-sized but great colours and have lasted well on my nails. The one I have is the "party" set, which comes with great pinks, greys/silvers, and greens, but the other sets are really beautiful too and I have a feeling I might go back and collect them all.

My other favourite is the Studio Prisim Eyeshadow Palette, which I have in "smoke", but also  comes in a great set of pinks, and everyday neutrals. The eyeshadows are really beautiful glimmers, and blend pretty easily. They're not so highly pigmented so you'll have to build up the colour if you want it really dark, but I really love the shades and the palette is a great deal, also at $10.

I was a bit hesitant to buy concealer over the internet without trying swatches first, but I took a bit of a gamble and went with their Studio Under Eye Concealer & Highlighter. The coverage is surprisingly good, the colour worked out well, and the highlighter is great for the corners of my eyes. The 2-in-1 thing makes my morning routine so much easier.

The Studio Lip Primer & Plumper is also a great 2-in-1 deal. The plumper doesn't work as well as I'd hoped but has a nice cinnamon-y tingle, and did fill in the lines of my lips. The primer is great, and my lipstick stayed in place all day, also with the help of the Lip Lock Pencil. I really like the Lip Lock Pencil because it goes on clear, which means you don't have to worry about finding matching or coordinating lipliners.

The Eye Refresh worked just okay - I didn't see a huge difference in my dark circles but it does leave a nice refreshing cooling feeling in the morning, which helps me feel more awake. The concealer does a better job at covering up my under eye area.

Stay tuned for part 2!
-Christina